上次说到不想用别人的图床,这边博客更新记录可以看到,这不现在就要给他安排上了。准备自建的图床放置一些私人的图片,无关紧要的还是放到公共的图床上。
0.图床搭建
晚上检索下群晖图床会有很多结果,这边选择了比较简洁的Lychee,GitHub地址在这照着教程搭起来就行。这次主要的任务在于https访问,这边做个记录📝。
1.增加Https访问
搭建好的是不能通过https访问的,别问我怎么知道的。下面就开整,让它跑起来
首先需要有证书,这边使用的是Let’s Encrypt 的免费证书,华硕路由里有这个设置,会帮助自动更新的。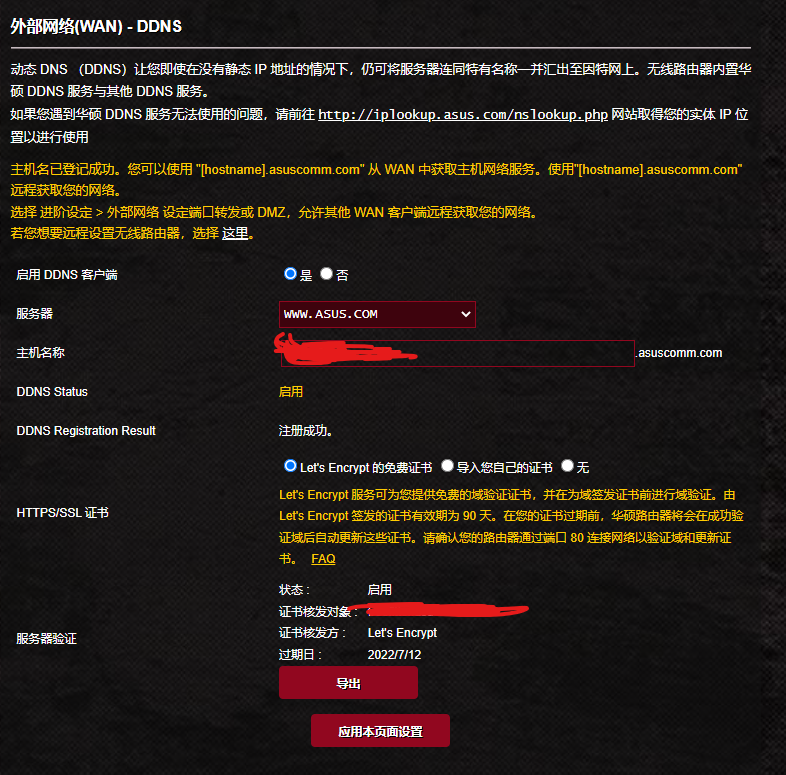
证书到手,现在开始去整Lychee上的Nginx
# 1、查出运行的容器
$ sudo docker ps -a
CONTAINER ID   IMAGE                                     COMMAND                  CREATED        STATUS                    PORTS                                         NAMES
5bee8392f00a   lycheeorg/lychee:latest                   "/entrypoint.sh nginx"   7 days ago     Up 17 hours (healthy)     0.0.0.0:6883->80/tcp, 0.0.0.0:6884->443/tcp   lycheeorg-lychee
# 2、进入容器开整
$ sudo docker exec -it 5bee8392f00a /bin/bash
新开一个标签把证书拷到容器里
# 1、获得容器的长ID
$ sudo docker inspect -f '{{.ID}}' lycheeorg-lychee
5bee8392fdedeede8646334743875634563457435cb1
# 先到证书存放的目录,然后执行以下命令
sudo docker cp cert_key.tar 5bee8392fdedeede8646334743875634563457435cb1:/etc/nginx/cert
# 查看容器
sudo docker ps
# 进入容器
sudo docker exec -it 5bee8392f /bin/bash
# 进入相应目录
cd /etc/nginx/cert
# 解压证书
tar -xvf cert_key.tar
# 重新载入配置
nginx -s reload
证书就位,开始整配置
配置路径在 /etc/nginx/nginx.conf
这边修改将80的配置修改成443的,然后添加80重定向到443的配置即可。配置文件完整如下:
user www-data;
worker_processes auto;
daemon off;

error_log /var/log/nginx/error.log;

events {
    worker_connections  1024;
}

http {
    include       mime.types;
    default_type  application/octet-stream;

    log_format  main  '$remote_addr - $remote_user [$time_local] "$request" '
                      '$status $body_bytes_sent "$http_referer" '
                      '"$http_user_agent" "$http_x_forwarded_for"';

    access_log  /var/log/nginx/access.log  main;

    sendfile        on;
    keepalive_timeout  65;

    # By default, if the processing of images takes more than 60s,
    # a 504 Gateway timeout occurs, so we increase the timeout here
    # to allow procesing of large images or when multiple images are
    # being processed at the same time. We set max_execution_time
    # below to the same value.
    fastcgi_read_timeout 3600;

    # We also set the send timeout since this can otherwise also cause
    # issues with slow connections
    fastcgi_send_timeout 3600;

    gzip  on;

    server {
		listen 80;
		server_name your.domain.com;
		return 301 https://$host$request_uri;
    }

    server {
        root /var/www/html/Lychee/public;
		listen 443 ssl;
        server_name your.domain.com;
        ssl_certificate /etc/nginx/cert/cert.pem;
        ssl_certificate_key /etc/nginx/cert/key.pem;
        ssl_session_timeout 5m;
        ssl_protocols TLSv1.2 TLSv1.3;
        ssl_ciphers ECDHE-RSA-AES128-GCM-SHA256:HIGH:!aNULL:!MD5:!RC4:!DHE;
        ssl_prefer_server_ciphers on;
        client_max_body_size 100M;

        # serve static files directly
        location ~* \.(jpg|jpeg|gif|css|png|js|ico|html)$ {
            access_log off;
            expires max;
            log_not_found off;
        }

        # removes trailing slashes (prevents SEO duplicate content issues)
        if (!-d $request_filename)
        {
            rewrite ^/(.+)/$ /$1 permanent;
        }

        # If the request is not for a valid file (image, js, css, etc.), send to bootstrap
        if (!-e $request_filename)
        {
            rewrite ^/(.*)$ /index.php?/$1 last;
            break;
        }

        location / {
            index  index.php
            try_files $uri $uri/ /index.php?$query_string;
        }

        # Serve /index.php through PHP
        location = /index.php {
            fastcgi_split_path_info ^(.+?\.php)(/.*)$;

            try_files $uri $document_root$fastcgi_script_name =404;

            # Mitigate https://httpoxy.org/ vulnerabilities
            fastcgi_param HTTP_PROXY "";

            fastcgi_pass unix:/run/php/php8.1-fpm.sock;
            fastcgi_index index.php;
            fastcgi_param SCRIPT_FILENAME $document_root$fastcgi_script_name;
            fastcgi_param PHP_VALUE "post_max_size=100M
                max_execution_time=3600
                upload_max_filesize=100M
                memory_limit=256M";
            fastcgi_param PATH /usr/local/bin:/usr/bin:/bin;
            include fastcgi_params;
        }

        # Deny access to other .php files, rather than exposing their contents
        location ~ [^/]\.php(/|$) {
            return 403;
        }
    }

    include /etc/nginx/conf.d/*.conf;
}
这边都整好了,群晖上也要加个443的端口映射。然后路由上也增加相关的端口映射,到此就整完了。现在访问一下试试。
2.写在最后
之前http的协议在https的博客上会被自动升级成https访问,但是图床又不支持,所以图片会挂掉,所以现在就能够愉快的玩耍了。